
Dog Spay Recovery: The Complete Owner's Guide
You did everything right. You booked the appointment, dropped off a healthy dog, and brought home a groggy, stitched-up version of the same animal who now cannot stop fixating on the one spot she is absolutely not supposed to touch. Welcome to spay recovery: the two weeks nobody fully prepares you for.
Spaying is one of the most routine procedures in veterinary medicine, but routine does not mean simple to manage at home. Most complications that do arise are not surgical; they are recovery failures: incisions that were licked, dogs that bounced back too fast, wounds that were not checked often enough. This guide closes those gaps. You will find everything needed to protect the incision, read warning signs early, choose the right protective barrier, and get through two weeks without unnecessary panic or preventable setbacks.
Quick Answer
Dog spay recovery typically takes 10 to 14 days of restricted activity. The incision must stay dry and protected from licking, usually with an e-collar or a recovery suit. Check the wound at least twice daily, restrict running and jumping for the full recovery period, and call your vet immediately if you notice continuous bleeding, swelling, discharge, or a foul odour from the site.
KEY TAKEAWAYS- Most dogs need 10 to 14 days of restricted activity and incision monitoring after a spay
- The incision must be physically protected at all times; licking takes seconds to cause serious damage
- An e-collar and a recovery suit are both clinically recognised barrier options; the right choice depends on your dog
- Call your vet for any bleeding, swelling, discharge, odour, missing sutures, or abnormal behaviour after surgery
What Spaying Actually Involves
Spaying is a surgical procedure performed under general anesthesia. It removes a female dog's reproductive organs to prevent pregnancy, eliminate heat cycles, and reduce the risk of several hormone-related diseases. In most U.S. practices, the standard operation is an ovariohysterectomy, which removes both the ovaries and uterus. Some veterinarians instead perform an ovariectomy, which removes only the ovaries and leaves the uterus in place.
According to the American College of Veterinary Surgeons and the Merck Veterinary Manual, both approaches produce equivalent long-term outcomes. Ovariectomy may result in a smaller incision and less abdominal trauma for appropriate candidates, though neither technique is universally superior. Your veterinarian will recommend the approach that suits your dog's health and anatomy.
The procedure typically takes 45 to 90 minutes. Most dogs are discharged the same day, slightly groggy from anesthesia and carrying instructions you may find yourself re-reading more than once. The incision is usually on the abdomen, closed with dissolvable internal sutures, external sutures or staples, or a combination of both. Understanding what is underneath that closure helps explain why the protection rules during recovery are non-negotiable.

Both ovariohysterectomy and ovariectomy are considered equivalent in long-term surgical outcome. The ovariectomy approach may offer a slightly smaller incision and reduced abdominal trauma in appropriate candidates, though the choice depends on the individual dog and the surgeon's assessment.
Source: American College of Veterinary Surgeons (ACVS); Merck Veterinary ManualTiming: When Should a Dog Be Spayed?
The AAHA canine life stage guidelines recommend that dogs expected to stay under 45 pounds be spayed around 5 to 6 months of age, often before the first heat cycle, which carries a meaningful benefit for reducing mammary tumour risk. For larger breeds, timing is less straightforward. The balance between the benefits of early spaying and potential impacts on orthopedic development varies by breed and body size, which is why AAHA's guidance recommends an individualised conversation with your veterinarian rather than a blanket rule.
For intact female dogs, the health risks of remaining unspayed are significant. A 2019 study estimated that approximately 25% of intact female dogs develop pyometra, a potentially life-threatening uterine infection, before the age of 10. Mammary cancer (breast cancer) risk is also influenced by hormonal exposure; Cornell University College of Veterinary Medicine, AAHA, and Merck all note that spaying before the first estrus offers the lowest risk profile for mammary tumours. The wider picture also includes pet overpopulation: the ASPCA estimates that 5.8 million dogs and cats entered U.S. shelters in 2025.
Before Surgery: What to Prepare at Home
Most owners focus on the surgery itself and arrive home underprepared. Spending 20 minutes setting up your home in advance makes the first 48 hours considerably easier, and reduces the risk of improvised decisions that can slow recovery.
- Designate a recovery space. Choose a room or area where your dog can rest without access to stairs, furniture she could jump on, or other pets who might disturb her. A playpen or exercise pen works well for smaller dogs.
- Set up a crate or low bed. She should not have to jump in or out of her sleeping space. Remove elevated beds and put a flat, comfortable surface at floor level.
- Have a barrier ready before you leave the clinic. Whether you choose an e-collar, a soft collar, or a recovery suit, do not plan to figure this out when you walk in the door with a groggy dog. Have it fitted and ready.
- Prepare water and a small meal. Most dogs can eat and drink a small amount the evening of surgery, though appetite may be reduced. Ask your vet for specific instructions before discharge.
- Know your emergency contact. Have your vet's number and an after-hours emergency clinic number written down before you need them.
Day-by-Day: What Recovery Actually Looks Like
Your vet's discharge instructions are the primary guide. The following timeline reflects typical patterns observed in routine spay recovery, not a replacement for your clinic's specific guidance.
Surgery Day
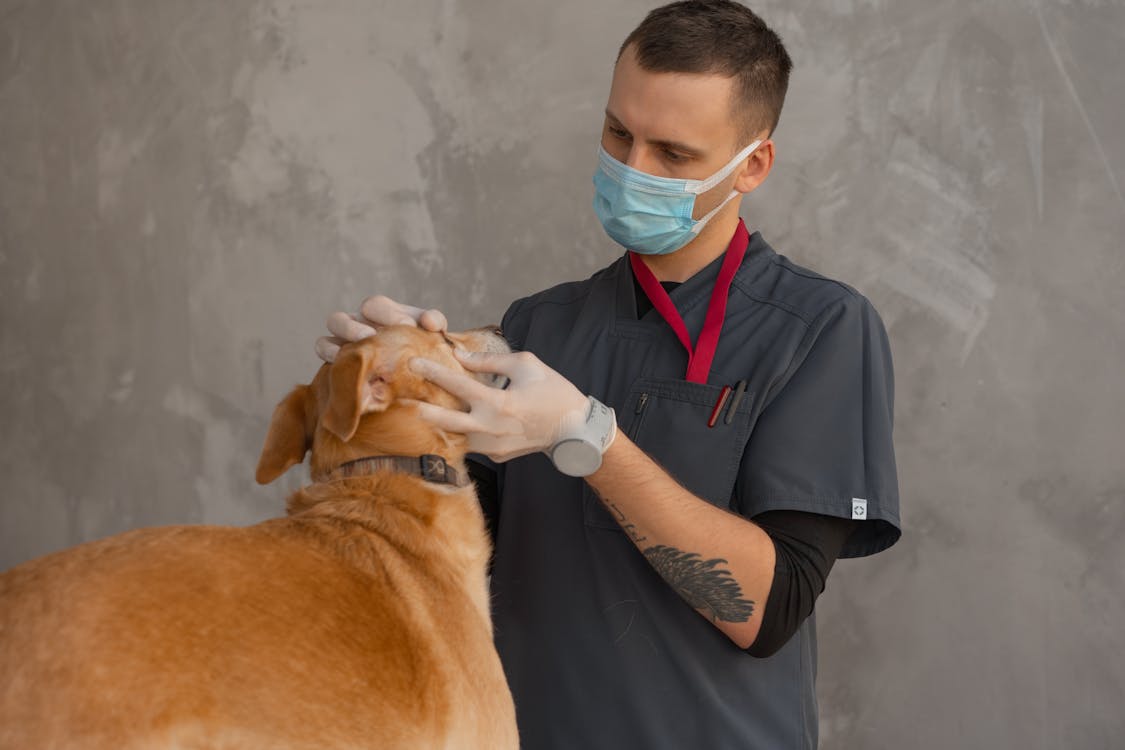
Incision Care: What Normal Looks Like and What Does Not
Twice-daily incision checks are not optional. The earlier a problem is caught, the simpler it is to treat. Remove the protective barrier briefly, use good light, and look carefully at the wound before replacing the barrier immediately.
Normal Healing Signs
- Mild bruising or skin discolouration around the incision, especially in the first 3 days
- Slight swelling directly at the wound edges
- A small amount of dried blood or clear-to-pale-yellow serum along the suture line in the first day
- The incision feels slightly warm to the touch initially
- Gradual reduction in swelling and redness over the first week
Warning Signs: Call Your Vet
- Continuous or heavy bleeding from the incision
- Increasing (not decreasing) redness, swelling, or warmth beyond the first 48 hours
- Yellow, green, or cloudy discharge from the wound
- A foul or unusual odour from the incision site
- Missing, loose, or damaged sutures
- The wound appears open or is gaping at any point
- Your dog appears to be in significant pain, refuses to eat beyond 48 hours, or is lethargic beyond day 2
| What You See | Likely Explanation | Action |
|---|---|---|
| Mild bruising, slight swelling, day 1 to 3 | Normal post-surgical response | Monitor; continue checks |
| Small amount of dried serum or blood, day 1 | Normal wound weeping | Monitor; keep clean and dry |
| Swelling increasing after day 3 | Possible seroma or early infection | Call your vet |
| Incision looks red and warm at day 5 or beyond | Possible infection developing | Call your vet today |
| Suture missing or wound open | Barrier failure or excessive activity | Call your vet immediately |
| Discharge with odour | Infection | Emergency vet contact |

Pain Management: What Your Dog Feels and What to Do
Veterinary anesthesia and post-operative pain management have improved significantly, and most dogs handled by modern practices are sent home with appropriate pain relief. That said, understanding what to expect and what to watch for gives you better tools for the recovery period.
Medications After Surgery
Most dogs are discharged with a short course of pain relief, which may include NSAIDs (non-steroidal anti-inflammatory drugs) such as carprofen or meloxicam. Some will also receive antibiotics, depending on the surgical approach and the individual vet's protocol. Administer these exactly as prescribed, with food unless instructed otherwise, and complete the full course even if your dog appears comfortable.
Never give human pain relief medication to a dog. Ibuprofen, acetaminophen, and aspirin are all toxic to dogs in varying doses. If you feel your dog is not comfortable on the prescribed medication, contact your vet to discuss adjustments. Do not substitute or supplement without veterinary guidance.
Source: VCA Animal Hospitals; American Veterinary Medical AssociationRecognising Pain in Dogs After Surgery
Dogs do not always vocalise pain clearly. The following behavioural changes after surgery can signal that your dog is more uncomfortable than expected:
- Restlessness or inability to settle, even in a quiet environment
- Repeated attention to the incision site (licking, chewing, biting)
- Guarding the abdomen or flinching when touched near the wound
- Loss of appetite persisting beyond 48 hours post-surgery
- Trembling, hunched posture, or reluctance to move
- Panting without obvious cause, especially at rest
If you observe several of these signs together, call your vet rather than waiting for the next scheduled check. Pain that is not managed adequately increases recovery complications.
If Your Dog Won't Leave the Incision Alone

The problem: After abdominal surgery, the incision is exactly where a determined dog can reach most easily. Licking is the single most common cause of post-op wound complications: it introduces bacteria, disrupts suture integrity, and can open a healing incision in seconds.
A Dog Recovery Suit covers the incision completely while allowing normal movement, eating, and rest. Unlike an e-collar, it does not obstruct vision or catch on door frames, which makes it significantly easier to manage across two weeks of indoor recovery.
- Post-spay and post-neuter abdominal recovery
- Preventing licking, chewing, and scratching at wound sites
- Owners whose dogs struggle to tolerate a cone
- Hot spot protection and skin condition management
E-Collar, Soft Collar, or Recovery Suit: Which Is Right for Your Dog?
There is no universal answer, and the best option depends on your dog's temperament, the incision location, and how diligently you can monitor her throughout the day. VCA Animal Hospitals explicitly states that a surgical recovery garment may be an appropriate alternative to an e-collar depending on incision location. That is clinical permission to think beyond the traditional cone, not an instruction to ignore it.
| Option | How It Works | Strengths | Limitations | Best For |
|---|---|---|---|---|
|
Hard E-Collar (Elizabethan collar) |
Rigid plastic cone prevents access to body | Highly reliable; blocks access to most body areas | Blocks vision; bumps into objects; disrupts eating, drinking, sleep; 77.4% of owners report reduced quality-of-life for the dog | Highly motivated lickers; wounds near the tail or paws; any dog who defeats other barriers |
| Soft Inflatable Collar | Padded ring around neck limits reach to body | More comfortable than hard cone; allows normal sleeping | Less reliable; flexible dogs can reach abdominal incisions; can be deflated or chewed | Mild cases; dogs who tolerate it without testing limits |
| Recovery Suit | Full-body garment covers incision directly |
Editor's Pick for Abdominal Incisions Covers wound directly; allows full vision and movement; less stressful than collar; easier daily management |
Must be properly fitted; requires twice-daily removal for wound checks; some dogs resist wearing | Abdominal spay and neuter recovery; dogs who struggle with e-collars; owners managing recovery solo |
| Combination Use | Recovery suit worn primarily; e-collar during unsupervised periods | Maximum protection when monitoring is not possible | Requires two products; more management | Determined dogs; owners away from home during the day |
A 2020 peer-reviewed owner survey on Elizabethan collar use in dogs and cats found that 77.4% of owners reported worse quality-of-life scores while their pet wore the collar, with negative effects noted across eating, movement, sleep, and overall behaviour. That study does not invalidate the e-collar; it explains why owners and vets are increasingly treating it as one option among several rather than the automatic default.
VCA Animal Hospitals' post-operative guidance states clearly that depending on the incision location, a surgical recovery garment that covers the incision may be worn as an alternative to an e-collar. For abdominal spay incisions specifically, a well-fitted recovery suit can provide reliable protection while allowing more comfortable movement and rest throughout recovery.
Source: VCA Animal Hospitals: Care of Surgical Incisions in DogsRecommended Product: Pupcovery Dog Recovery Suit
- Post-spay and post-neuter abdominal recovery
- Dogs who struggle with traditional e-collars
- Wound protection and hot spot management
The Pupcovery Recovery Suit is designed specifically for abdominal surgical recovery, covering the incision site with soft, breathable fabric while leaving vision and normal movement unaffected. The adjustable, zip-on design makes twice-daily removal for wound checks straightforward. It is built to withstand the full recovery period with double-stitched seams and comes with a 30-day warranty.
- Soft, breathable fabric; comfortable for extended wear
- Easy-on zip design; simple to remove for daily incision checks
- Adjustable fit across a range of dog sizes and body shapes
"This is so much better than dealing with a cone. The fabric is soft, breathable, and comfortable enough that my dog could relax and move around normally. The fit was true to size and the quality exceeded my expectations."
- Significantly more comfortable than a traditional e-collar for daily living
- Stayed securely in place without slipping or shifting
- Dog moved, ate, slept, and rested normally while wearing it
Managing the Barrier Consistently
The most common recovery mistake is removing the protective barrier for what feels like a quick break. That is when incidents happen. A dog does not need long to do serious damage to a healing incision; a focused licking session of even 20 to 30 seconds can introduce infection or disturb sutures.
- Remove only for wound checks. Take off the barrier, inspect the incision thoroughly, and replace it before your dog can investigate the area herself.
- Check fit daily. A recovery suit or collar that has shifted or loosened may no longer be protecting the wound effectively.
- Keep the garment clean. If you are using a recovery suit, rinse or replace it if it becomes soiled. A dirty barrier sitting against a healing wound is counterproductive.
- Do not reward removal. Some dogs quickly learn that scratching, pawing, or making noise results in collar removal. Resist rewarding this pattern.
- Supervise during all non-crate time. If you cannot watch your dog directly, she should be in a safe, confined space with her barrier in place.
The Health Case for Spaying: Beyond Population Control
Pet overpopulation is often cited as the primary argument for spaying, and the numbers are stark. The ASPCA estimates that 5.8 million dogs and cats entered U.S. shelters in 2025, with hundreds of thousands euthanized due to overcapacity. Responsible pet ownership and spay-neuter programmes are among the most practical tools available to reduce shelter pressure.
But the health case for spaying an individual dog is equally compelling. Intact female dogs face a meaningful risk of pyometra, a severe uterine infection that can become life-threatening with little warning. One study estimates that approximately 25% of intact female dogs are affected before the age of 10. Treatment typically requires emergency surgery, and the prognosis declines significantly with delayed intervention.
Mammary tumour risk is also linked to hormonal exposure. According to AAHA, Merck, and Cornell University College of Veterinary Medicine, spaying before the first estrus is associated with the lowest risk of mammary cancer in dogs. The benefit is less pronounced after later spays, but the risk reduction is still meaningful compared to leaving a dog intact throughout her life.
Spaying before the first estrus is associated with the lowest risk of mammary tumour development. One study estimated that 25% of intact female dogs develop pyometra before age 10. The timing of spaying should be discussed individually with your veterinarian, taking into account breed, size, and orthopedic considerations, particularly for large and giant breeds where early spaying may affect musculoskeletal development.
Source: AAHA Canine Life Stage Guidelines; Cornell University College of Veterinary Medicine; Merck Veterinary ManualCommon Recovery Mistakes and How to Avoid Them
Most post-operative complications are not surgical. They are management failures that happen in the home during the two-week recovery window. These are the mistakes veterinary teams see most often.
- Removing the barrier too early or too frequently. Even a few unsupervised minutes can be enough for a motivated dog to damage a healing incision. The barrier comes off only for wound checks, then goes straight back on.
- Allowing too much activity because the dog seems fine. Dogs regularly feel better than their incision has healed. Normal energy returning on day 3 or 4 does not mean the internal layers have closed. Stick to the restriction timeline your vet provided.
- Getting the incision wet. Bathing, swimming, or walking through wet grass can introduce bacteria and soften sutures. Keep the wound dry until your vet confirms healing is complete.
- Skipping medication doses. Pain relief and antibiotics should be administered on schedule for the full course. Stopping early because the dog appears comfortable can leave her under-managed or susceptible to infection.
- Not checking the incision daily. Early-stage infection caught on day 4 is manageable. The same infection unnoticed until day 8 may require more aggressive treatment. Two minutes twice a day is a small investment with a significant payoff.
- Letting the wound get soiled. If you are using a recovery suit, it needs to stay clean. A dirty garment sitting against a healing incision defeats its purpose entirely.

Plan the Barrier Before Surgery, Not After
VCA recommends having your wound-protection barrier in place before you need it. Arriving home with a groggy post-surgical dog and then trying to order, size, and fit a recovery garment is not ideal. The Pupcovery Dog Recovery Suit is designed to be ready from day one: soft, breathable, easy to put on, and straightforward to remove for daily incision checks.
- Covers abdominal incision completely without restricting vision or movement
- Soft, breathable fabric designed for comfortable all-day and overnight wear
- Easy-on zip design allows quick removal for wound monitoring
- Dogs recovering from spay or neuter surgery
- Dogs who do not tolerate traditional e-collars
- Post-surgical skin condition and hot spot management
- Owners who want to reduce stress during the recovery period
Frequently Asked Questions
Sources and References
- Ovariohysterectomy, American College of Veterinary Surgeons (ACVS)
- Spaying and Neutering, American Veterinary Medical Association (AVMA)
- Canine Life Stage Guidelines: Reproductive Health, AAHA
- U.S. Animal Shelter Statistics, ASPCA
- Outcome of Pyometra in Female Dogs, PMC/NCBI
- Care of Surgical Incisions in Dogs, VCA Animal Hospitals
- Post-Operative Instructions in Dogs, VCA Animal Hospitals
- Welfare Implications of Elizabethan Collar Use on Dogs and Cats, Animals (2020)
- Effect of Post-Operative Clothing on Stress After Ovariohysterectomy in Cats, Thai Journal of Veterinary Medicine (2025)
- Merck Veterinary Manual: Ovariohysterectomy and Reproductive Surgery in Dogs
- Cornell University College of Veterinary Medicine: Mammary Tumors in Dogs
- Pupcovery Dog Recovery Suit, Pupcovery.com
Further Reading
- Dog Recovery Tips and Guides, Pupcovery Blog
- Spaying in Dogs: What to Expect, VCA Animal Hospitals
- Ovariohysterectomy Overview, American College of Veterinary Surgeons
- Canine Reproductive Health Guidelines, AAHA
- Pyometra in Dogs: Causes, Symptoms and Treatment, VCA Animal Hospitals
- Spay/Neuter Your Pet, ASPCA
- Spaying of Dogs, Merck Veterinary Manual